A Great Resource


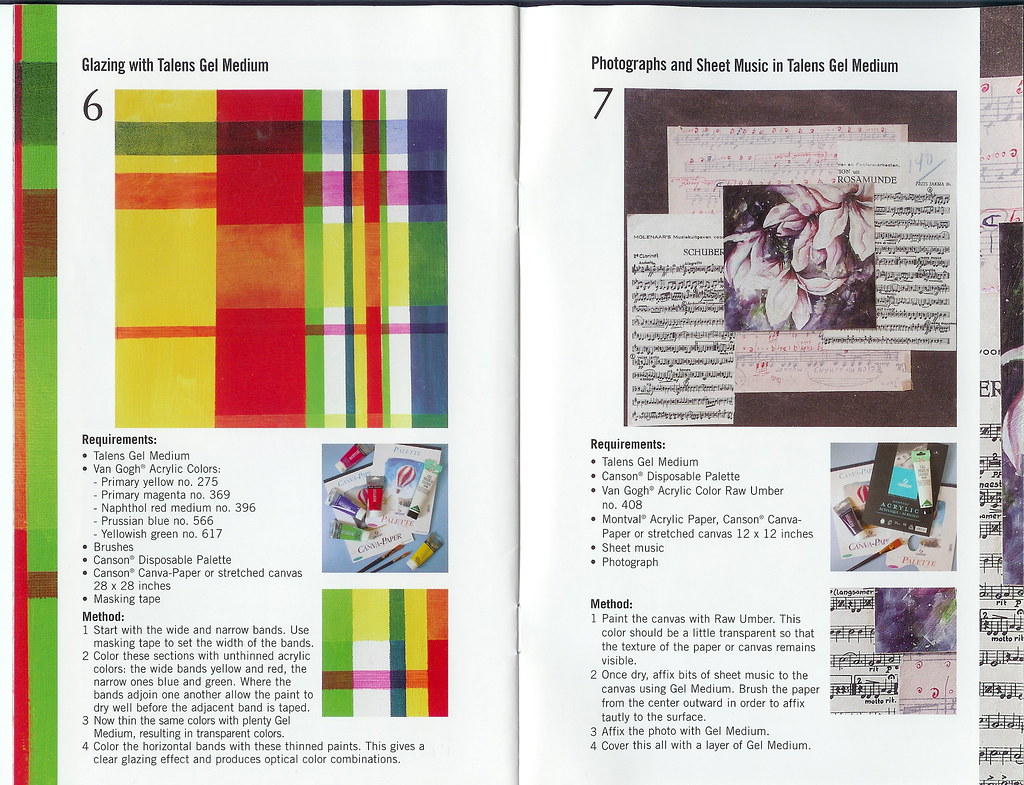
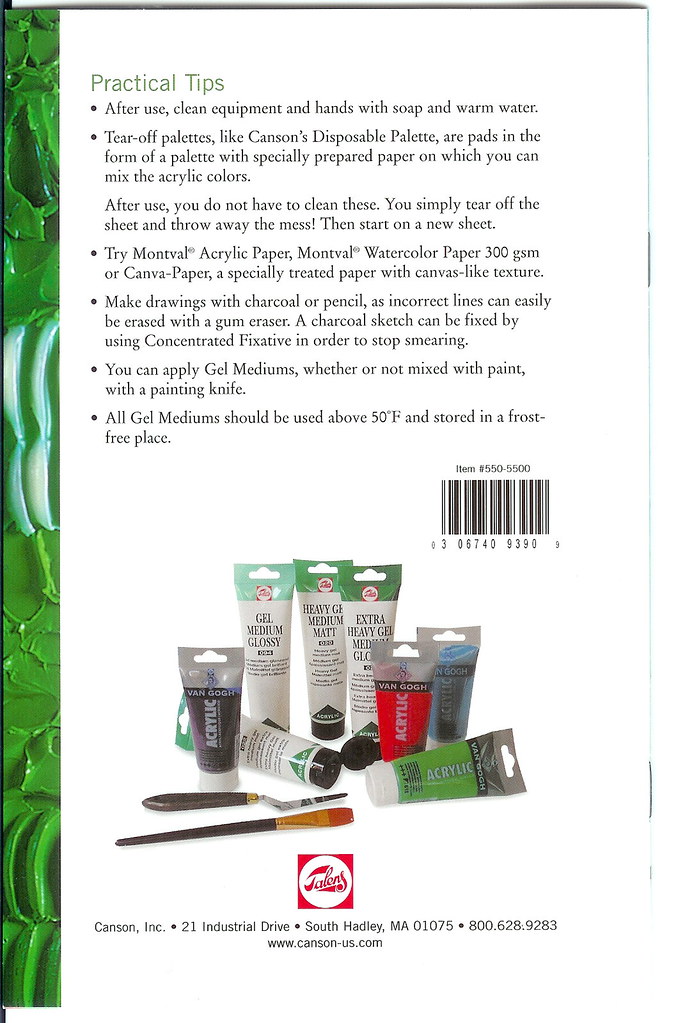
I am going to spend the day in the creative zone and am hoping to get a lot done. Before I get started, I wanted to post this little booklet I've had for awhile. It has some good explanations/examples of acrylic paints and mediums. It was put out for Talens mediums (manufactured by Canson - who also distributes the Van Gogh line) but works as a good "across the board" guide. I decided to scan it and post it here for your review. It should give you quite a bit of insight into how different acrylics mix to form various effects. (To view larger images simply click on the above pictures - when appear then mouse over them and click on the "+" magnifying glass.)

I have never worked with this line of acrylics so I cannot provide an opinion of them. If anyone has, please post a comment as I'm interested to hear what users think of this brand. I was definitely much more impressed with this booklet than I was with their website (which you can visit by clicking on the "Canson" link above). The website does not include much information at all and could be infinitely better, in this Queen's opinion.

The pages are very small here; if you go to my flickr account (which is located here) and click on the individual images they will pop up to a size where the text is readable. These pages can also be printed for easier reading and reference.
I hope this booklet provides you with some additional knowledge. If it did, leave me a comment.

NOTE: I tried to contact Canson repeatedly for permission to post copies of this booklet. It took me forever to find any contact information - and I emailed them several times. Unfortunately, I have never received a response. If anyone affiliated with Canson sees this and would like to discuss the posting of this booklet, please contact me. I would be most appreciative! ALSO: The information contained in the booklet is the sole property of Canson, Inc. I did not conceptualize any information found in the booklet and take absolutely no responsibility for anything relating to said information. I am providing this guide as a resource for the visitors of my blog - please read all instructions (where applicable) and use common sense!

Feeling Grateful


Do you ever have those days where your heart is light and you feel a strange sense of gratitude to the world? Nothing unspeakably great has happened - just something "small" in the grand scheme of things - but it really touches your heart and makes you realize how connected you are to the universe? I just had one of those experiences.

I was going through email - which I'm still behind on - before heading to bed. I came across a comment on my blog from Nancy that made me smile. Not a slight smile, either - a big, goofy, cheesy grin. Her words totally changed my attitude and my disposition. It's so nice to feel like you had a small impact on someone - no matter how passing or minute. Being a stay-at-work mom (which is really what every woman is who does not get to leave the house 8 hours a day!) and doing your best to raise great kids who will become wonderful adults does not come with many reminders you are doing something that makes a difference. Well, at least not when you're in the trenches. It feels like I get juice, track down little people, pick up toys and clothes, do laundry, stop fights, help with homework, get juice, track down little people...well, you get the idea. Even though I am constantly reminding the childebeasts to say "please", "thank you", "yes, ma'am" and "no, sir", those reminders (and manners!) seem to get lost in kid-oblivion when they deal with me. Between the fighting, the whining, the complaining...most days I feel like I make no difference, am having no real impact on the world and am instead, spinning my scepter like a fool.

Everyday isn't like that - just almost everyday! (And believe me - after today, it DEFINITELY feels like that!)

Then something unexpected happens. Something wonderful. No - I don't mean the childebeasts surprised me by helping a little old lady cross the street (rather than mowing said lady down with their bikes!) or some other sweet gesture to give me a small glimpse that my hard work is paying off...no, no. I am so over thinking something like that will happen! However, my art seems to pay off and sustain me in surprising ways. Like Nancy's comment and link on her blog. It was sweet and wonderful and unforeseen. Unlike the normal hits-and-run I encounter (which usually are actual hits-and-run, sadly) this was a hit-and-run of the best sort.

It's funny that a small action or a kind word can impact someone on the most heartfelt level. You just never know what impact you have.

Which reminds me - if you haven't gone over and checked out Nancy's blog Paper Friendly yet, what are you waiting for?? Check it out and revel in her creative inspiration! And Nancy - thank you for lifting my spirit and letting me know that someone appreciates what I do!

Funky Art Journal


FUNKY ART JOURNAL ARRIVED!!

I am SO totally thrilled that my Funky Art Journal arrived from my swap partner. Sherre (from Art Techniques) organized a rockin' swap based on Traci Bautista's Collage Unleashed book. Since there ended up being an odd number of people in the swap, Sherre arranged it so you sent your Journal to a different person than you received one from. I will send mine to Susan and receive one from Sara. I was working on the final minor additions to my Journal when it was thrown out during the whole "infestation" ordeal. I am still reeling from that - and am working on version two. However, Sara's journal brightened my mailbox big time and I couldn't let the royal occasion pass without showing off her beautiful creation!

It is obvious that Sara has incredible talent - the entire Journal is nothing short of stunning! Every page is gorgeous and her style is so different than mine - which makes the Journal even more special to me. The cover is astounding - carefully stitched and full of beautiful colors and brilliant metallics. She bound the book with the latch hook method - so the binding spills everywhere with gorgeous ribbon. This Journal is priceless and definitely my very favorite possession. Sara wrapped brown tissue around the book when she shipped it - and now I keep taking it out of the tissue to look at it and touch the pages - then return it carefully to the tissue. I've already pulled it out countless times just so I can stare at the magnificence of her work.

I am totally blown away by her gorgeous book and honored to have it. I don't know Sara personally - but anyone who trades or swaps with her is in for a top-notch experience. Her talent oozes from each page and the amount of work she puts in to every detail is unbelievable. I'm in love!

Sara went well above and beyond the swap requirements by including TONS of pages. The Journal is substantial and I will never bring myself to write in it or add anything else to it - to add anything would be to mar it's inherent beauty. It is utter perfection just the way it is! Since there are so many wonderful pages I couldn't include them all here - but it would be a waste not to have them available for everyone to gawk at. I included them in my Photo Bucket album - so you can see the entire book by clicking here. Below are just a few of my favorites - it was almost impossible to choose only a few!! Do yourself a favor and check out the rest of the book - and soak up some of Sara's inspiration. You can't look at her Journal and not want to go create something!


Please note that this journal is the creative work of Sara Davis. Sara retains all rights to this amazing piece - I'm just the happy recipient of such an incredible Journal!! Sara deserves major props!!

Gone to the Birds

I had a post all written out and was getting ready to post it when Windows decided my computer needed an update right away and couldn't be bothered with giving me a little notice. All of a sudden my computer shut itself down and POOF! Post went to the great beyond.

I was woken up this morning with some bird's squawking - at 3:35! Since I've lived in the same place for almost 10 years I'm familiar with all the neighborhood locals. We have an owl and some woodpeckers who have helped to usher in the spring every year. They have become so common I suppose I don't really pay attention to their morning songs - but this new arrival is impossible to tune out. "DOOoop! DOOoop!" Very shrill and loud - and unlike any other bird I've ever heard. It went on and on - for about half-an-hour all I heard was this noisy bird. It was evidently driving the cats as crazy as it was making me - they perched on my windowsill Every time the bird would "DOOOop DOOoop" the cats would claw at the screen and hiss - totally unlike them. I'm guessing the bird has made a new home around here - I just wish he would wait til later in the day before sending out his nest warming invitations. Especially when it's so clear he was giving directions to his friends in...ooohh...BRAZIL!

About the paper molding/casting technique - my self-appreciation was short-lived since apparently I was the only person in the universe who hadn't heard of this technique! I thought I was real smart - but it now seems I only reinvented the wheel. Oh well - it's on to the next technique i guess.

I am trying to find a source for great UM rubber. I really want some new texture options - but I need to find some symbols and background images. I don't really want the hard plastic plates - but I wouldn't mind having a couple of those. What I would really like is UM rubber - size isn't important. Who knows where to get some - that's relatively inexpensive? The images don't have to be extremely detailed with tiny shapes. If you know where to get some, please let me know!

Paper Molds with Color

So I have this good friend Judi - who is an absolute riot on top of being a phenomenal artist. I love looking at her creations. Vicky is the one who gave me a jumping-off point for doodling - and taught me how to find and perfect my own style - Judi is the one who motivates me to do it. Judi regularly cracks me up with her off-beat humor and unique take on life. I have officially "knighted" Judi Her Royal Hineyness of Castle Antics - we'll be referring to her as JJ (Jester Judi) for short. After perusing JJ's blog yesterday, I was reminded of a very simple paper molding technique I came up with several years ago. I haven't seen this particular technique anywhere else - so I'm not sure if it's a "Kingdom Original" or if it's a simple case of me reinventing the proverbial wheel. That aside, this technique is super easy and I guarantee everyone has the necessary supplies easily available. How can I guarantee that? Read on...


Since I'm inept with the royal camera, I have included two pictures of the paper molds I made. In reality the colors are somewhere between the washed out yellow picture on the top, and the shadow ridden picture on the bottom. (These are the results even after the Queen employed the services of Her picture editing software. What was that post about "needing" PhotoShop??) I'm postulating that my pieces came out with a softer effect that JJ's because of the substrate used - and the fact that I have not put any sort of finish on mine. After I add the hands to the watch then I will probably finish these off - unless I end up dorking around and also add some detail work or doodles.
Before I move onto the supplies and instructions, I want to mention the two flowers are done on one substrate, while the watch and leaf were constructed from the material I originally used when I began playing around with this. Both work just fine and will yield similar results.

SUPPLIES
Rubber stamp with image of your choice*
Warm water

TOILET PAPER -or- PAPER TOWEL**


* Regular rubber stamps work best altho you can try using foam or clear stamps. The technique works best with deeply etched rubber - however, if you want a more subtle impression then try foam or the clear stamps. Another note: It is much more difficult to get a good impression with a detailed stamp - open images without tiny details always come out more clear. Experiment with the look you want - don't let my observations limit your creativity...I am only providing this information to save others from the headaches I've encountered.
** You do not need TP and PTs - it's either/or. I began my exploration with this technique with TP...but PTs are another option. Results will vary with different TP brands - the above samples are done with one-ply Charmin. (And yes, you now know which brand is employed in the royal thrones!) Since Charmin, Northern and Angel Soft have a "linty" feel, you will end up with a softer and fuzzier piece. These brands will get fuzzier or "lintier" the more they are rubbed and worked with. If you use PTs, Viva is a terrific brand because of the fabric-like qualities it has. Experimenting with different brands of TP and PTs is sure to increase the usefulness of this technique - so explore! Go on...do it. It's only TP and PTs - inexpensive things found in every home and meant to be thrown out anyway. IF you do not have TP or PTs readily available, you have much bigger issues than art. Contact me IMMEDIATELY - we need to talk.
And yes, "linty" and "lintier" are real words...look!


TP: Count out 10 squares, accordian fold. (Any less than 4 squares and the final piece is flimsy and doesn't take detail very well.) PT: Fold PT in half, trim larger than image.

(
A note on TP: Your image needs to be smaller than the size of the TP square. If you try to use an image larger than that, the perforation on the TP usually tears, leaving a nasty gap in your finished piece. If you want to use a larger image just use a PT.)


Keeping TP/PT flat, run under warm water. (I don't know why warm water works better - it just does. It's not polite to argue.) Gently fold or scrunch to wring out water - carefully squeeze between your fingers to remove excess water. Removing every extra drip isn't necessary - it just shouldn't be dripping wet. Unfold or unscrunch TP/PT and flatten out between fingers. It's important not to rub the wrinkles out - you'll end up with a linty, uneven surface. Once it's flat, center on image.


Begin pressing TP/PT into the image from the center. It's important to use firm but gentle pressure to push TP/PT into the crevices - but do not to rub! Firmly press. Using your thumb and fingers, continue pressing TP/PT into image, keeping TP/PT from slipping by holding the TP/PT to the image with a thumb. (If you move the TP/PT after you've begun imprinting the image - remove TP/PT and turn it over. Gently pat out image so the TP/PT is flat and start over.) Continue pressing until you feel you have a good impression, remembering the image won't be as clear on the back (the side you see) because of the layers of TP/PT. You can also use a brayer. Be careful when pressing that you only press the image - don't press around the edge of the stamp or you'll end up with strange edges around your image.

(
Are you getting the keywords of this project are gentle and press?!)


Create a deckle edge by holding TP/PT on image with thumb and gently tearing excess TP/PT away, using the wood mount as a guide. You can also leave it until the mold is dry and cut away the excess (like I did on the colored samples above). Set aside to dry.


Once dry, lift off TP/PT. Altho you need to be gentle with the dried piece, it is surprising resilient and will hold up pretty well if you choose to add color. I have used Perfect Pearls, colored pencils, chalk, rub on metallics and mica powders to color the images. The other neat effect is to color the toilet paper or paper towel before imprinting the image. These also rock when left natural - the effect is subtle and regal when it's just the imprint with no color.

These are great for collage, cards, ATCs - anywhere you want to add 3D interest. Have fun - and don't forget to let me know what you come up with!

Neat Site

Good morning! I just found out about a pretty neat site that I wanted to pass on to you.

A lady in one of the Yahoo groups I belong to (Art Group Newbies) was talking about a website service where you "sell" things for points and are then able to "buy" things on the website with the points you earn. You get 15 points just for signing up - and 10 points for each person you refer. The site is called PoshPoints and you should check it out. If you end up deciding to join, please use this link so I get referral points.


There are some neat art items are available and people list ATCs and things for sale. The seller pays shipping so it's important to consider the weight of the item(s) your selling. Thanks for passing along this fun new way to acquire free things, Linda!
Related Posts with Thumbnails

Please Vote

Dream Boogie

Dream Boogie with SARK

Unbelievable Awards

Check This Out